StyleGAN on Jetson Nano
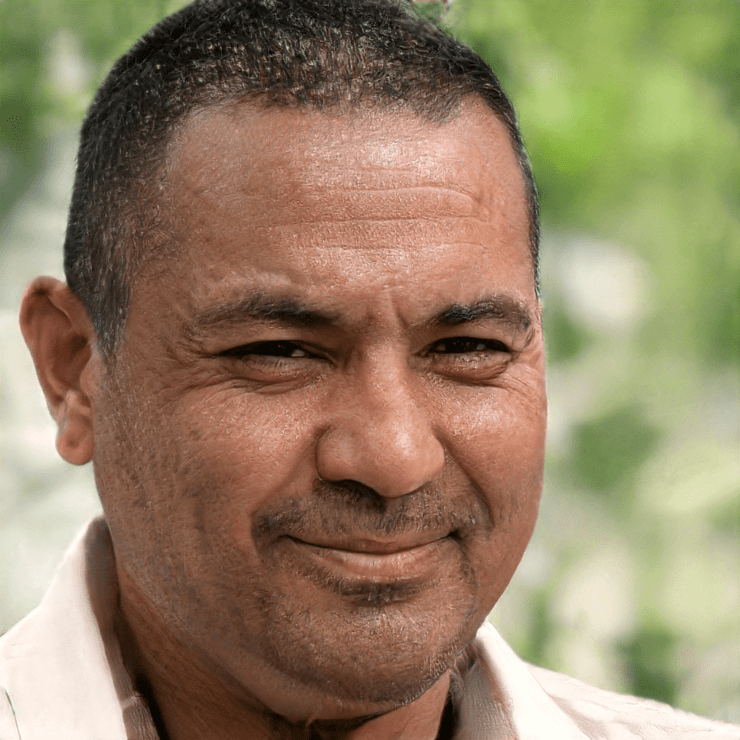
Can you tell this person is not real? He is generated by machine learning called StyleGAN. I will note my trying StyleGAN on Jetson Nano.
https://github.com/NVlabs/stylegan (opens new window)
Maybe I can't try the training phase because of its machine specs but I have succeeded image generation with a trained model on Jetson Nano.
While my constructing environment, posts written by Karaage were very useful.
- Jetson Nano関係のTIPSまとめ (opens new window) (Japanese)
- Jetson NanoにJetPack 4.4/4.5を入れてTensorFlow・物体検出・姿勢推定・ROS2(Realsense)・ROS1を動かす (opens new window) (Japanese)
# Preparation
First, SSH Jetson Nano which has been initialized with JetPack.
(Refer this post for initializing JetPack)
$ ssh kaz@192.168.55.1
Then install a swap file. In the last post I created a swap file by typing commands directly on the terminal, but at this time I used this script (opens new window) published on GitHub 🙏
$ git clone https://github.com/JetsonHacksNano/installSwapfile
$ cd installSwapfile
$ ./installSwapfile.sh

# check
$ free -m
2
3
4
5
6
The above Karaage also publishes a script for downloading libraries nesessary for machine learning and installing them correctly on this repository (opens new window). I also used this script. 🙏
In my case, I initialized Jetson Nano with JetPack 4.6 while this scripts mentions under 4.5, but actually scripts for 4.5 seem to work correctly at least at my environment.
First I tried to install each library individually, but some error had occurred. Maybe it is so common that you have some trouble resolving library dependencies in machine learning. So if you are using JetPack, I would say it is quite easier to use useful scripts like this than to install individual libraries.
$ git clone https://github.com/karaage0703/jetson-nano-tools
$ cd jetson-nano-tools
$ ./install-tensorflow-v45.sh
2
3
In addition, StyleGAN requires Pillow.
$ sudo pip3 install -U Pillow
# Download and execute StyleGAN
Clone StyleGAN from GitHub, and try pretrained_example.py, which demonstrates the image generation with an already trained model prepared by NVIDIA.
$ cd ~
$ git clone https://github.com/NVlabs/stylegan
$ cd stylegan
$ python3 pretrained_example.py
2
3
4
When I first try this script, an error occurred and it said "OSError: Google Drive quota exceeded", then I downloaded the trained model file on Google Drive (opens new window) directly.
Then transfer this file to Jetson Nano. (It is not necessary if you downloaded this on a browser in Jetson Nano)
# It is not necessary if you downloaded this on a browser in Jetson Nano.
# change the user account name if needed.
$ scp ~/Downloads/karras2019stylegan-ffhq-1024x1024.pkl kaz@192.168.55.1:/home/kaz/stylegan/
2
3
Then modify pretrained_example.py to load the downloaded file.
--- pretrained_example.py.bk	2022-02-01 15:29:21.141652160 +0900
+++ pretrained_example.py	2022-02-01 15:44:22.893303912 +0900
@@ -20,8 +20,9 @@
     tflib.init_tf()

     # Load pre-trained network.
-    url = 'https://drive.google.com/uc?id=1MEGjdvVpUsu1jB4zrXZN7Y4kBBOzizDQ' # karras2019stylegan-ffhq-1024x1024.pkl
-    with dnnlib.util.open_url(url, cache_dir=config.cache_dir) as f:
+    # url = 'https://drive.google.com/uc?id=1MEGjdvVpUsu1jB4zrXZN7Y4kBBOzizDQ' # karras2019stylegan-ffhq-1024x1024.pkl
+    # with dnnlib.util.open_url(url, cache_dir=config.cache_dir) as f:
+    with open("./karras2019stylegan-ffhq-1024x1024.pkl" , "rb") as f:
         _G, _D, Gs = pickle.load(f)
         # _G = Instantaneous snapshot of the generator. Mainly useful for resuming a previous training run.
         # _D = Instantaneous snapshot of the discriminator. Mainly useful for resuming a previous training run.
2
3
4
5
6
7
8
9
10
11
12
13
14
Next executing again, another error occurred. The error said "Resource exhausted: OOM when allocating tensor".
After investigating, it seemed that there was not enough memory, so I limited the memory used by TensorFlow in a process and tried it again. About this error, I referred to here (opens new window) (Japanese).
First I added the following lines to pretrained_example.py, tried the script and it got killed, then I removed these lines and tried it again.
import tensorflow as tf

gpu_options = tf.GPUOptions(per_process_gpu_memory_fraction=0.7)
sess = tf.Session(config=tf.ConfigProto(gpu_options=gpu_options))
config = tf.ConfigProto()
config.gpu_options.allow_growth=True
sess = tf.Session(config=config)
2
3
4
5
6
7
Finally, a results directory was created and a image of the following smiling man was also generated 😃
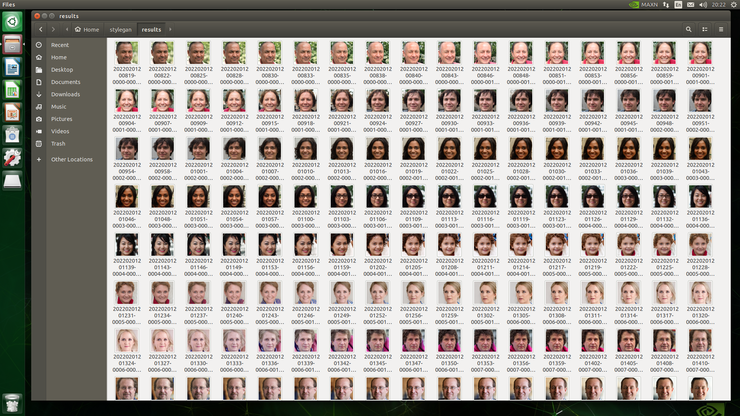
By the way, in StyleGAN, a variable called latent vector is used when generating a new image. Another image can be generated by changing this latent vector variable.
The follwoing capture is a result of changing latent vector little by little.