How to Reduce AWS Costs with S3 and CloudFront
I'm going to show how I reduce AWS costs with a simple configuration of S3 and CloudFront.
# Overview
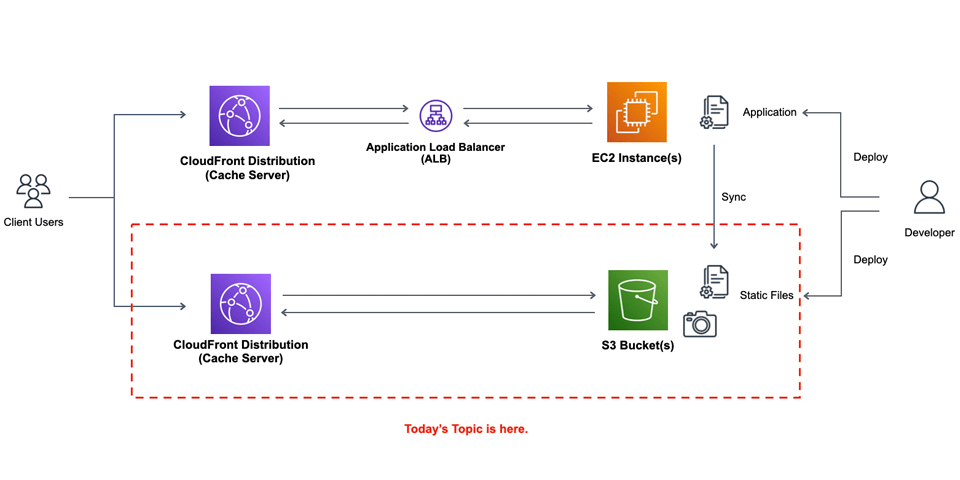
What I did for this cost reduction was just to send static files to S3 storage and allow them show through CloudFront distribution.
- Sync static files between EC2 instances and S3 storage, and allow access to S3 objects through CloudFront.
- Put another CloudFront distribution also before ALB.
- You can't set naked domains for CloudFront if you don't use Route 53, so I configure the naked domain DNS address to an EC2 instance and let the access redirect to a non-naked domain.
Application design was not changed so much at this time because what I want to do is just to reduce AWS costs and couldn't spend so much time for it. If you want to create a new project, I think it is also a good design to create each page as static files, put them as S3 objects, let them show through CloudFront, and let all dynamic content be got via ajax or something like Dynamic site generators or SPAs (Single Page Applications).
Anyway, it can result to a large reduction just to move static files to S3 and deliver them via CloudFront 😃
# Create a S3 Bucket
Although you can create S3 buckets in AWS management console, I usually use command line scripts with Python. This is not necessarily necessary, but in my case, I want to make sure my configuration of each operations are always the same.
Either way, notice the following:
- Set
Static website hostingenabled. (You can find it inPropertieswith the AWS Management Console). - Allow
s3:GetObjectinBucket policy. (Permissionsin Management Console) - Allow the public access. (uncheck
Block all public accessin Management Console)
To allow s3:GetObject, Bucket policy would be like this:
{
  "Version":"2012-10-17",
  "Statement":[
    {
      "Sid":"AddPerm",
      "Effect":"Allow",
      "Principal": "*",
      "Action":["s3:GetObject"],
      "Resource":["arn:aws:s3:::{Backet Name}/*"]
    }
  ]
}
2
3
4
5
6
7
8
9
10
11
12
# [boto3] create a S3 Bucket
A script to creates S3 bucket would be like this:
import json
import boto3

bucket_name = 'Bucket Name'
aws_region = 'ap-northeast-1' # Asia/Tokyo. Modify if you need.

s3 = boto3.client(
	's3',

	# You might not need to specify these AWS Keys in AWS env.
	aws_access_key_id = AWS_ACCESS_KEY_ID,
	aws_secret_access_key = AWS_SECRET_KEY,

	# Modify your own region
	region_name = aws_region,
)

# Create a Bucket
s3.create_bucket(
	Bucket = bucket_name,
	ACL = 'public-read',
	CreateBucketConfiguration = {
		'LocationConstraint' : aws_region,
	}
)

# website Configuration
s3.put_bucket_website(
	Bucket = bucket_name,
	WebsiteConfiguration = {
		'ErrorDocument' : {
			'Key' : 'error.html',
		},
		'IndexDocument': {
			'Suffix' : 'index.html',
		},
	}
)
# set the Backet Policy
s3.put_bucket_policy(
	Bucket = bucket_name,
	Policy = json.dumps({
		"Version": "2012-10-17",
		"Statement": [
			{
				"Sid": "AddPerm",
				"Effect": "Allow",
				"Principal": "*",
				"Action": "s3:GetObject",
				"Resource": ("arn:aws:s3:::%s/*" % bucket_name),

			}
		]
	})
)
2
3
4
5
6
7
8
9
10
11
12
13
14
15
16
17
18
19
20
21
22
23
24
25
26
27
28
29
30
31
32
33
34
35
36
37
38
39
40
41
42
43
44
45
46
47
48
49
50
51
52
53
54
55
56
# Create s CloudFront Distribution
As the same as S3, you can create CloudFront distributions in AWS management console, but I use command line scripts to do so. Anyway I recommend you to keep a record of your configuration because CloudFront has a lot of Configuration items.
- Configure the
Originthe S3 bucket we have already created. - In this time, HTTP is set to redirect to HTTPS.
- Set
CNAMEboth with "www" and without "www". However, you can't set Naked domains to CloudFront if you don't use Route53, so in my case, I set naked domain to an EC2 instance and make it redirect a non-naked domain. - Set
index.htmlasDefault Root Object.
# [boto3] Issue an ACM Certificate
You need to get an AMC Certificate before creating a CloudFront distribution.
When you request the issuance, you can choose E-Mail authentication and DNS authentication. If you choose E-Mail one, you need to make sure you can recieve an e-mail through your domain's email address, so in this time we choose DNS authentication.
The following script shows what you have to set up for DNS authentication and check the status of the ACM certificate issuance.
import json
import boto3

acm_domain = '{Your Domain}'
acm_cname = [
	domain,
	('www.%s' % domain),
]
aws_region = 'ap-northeast-1' # Asia/Tokyo. Modify if you need.

acm = boto3.client(
	'acm',

	# You might not need to specify these AWS Keys in AWS env.
	aws_access_key_id = AWS_ACCESS_KEY_ID,
	aws_secret_access_key = AWS_SECRET_KEY,

	# Modify your own region
	region_name = aws_region,
)

def acm_get(domain):
	global acm

	res = acm.list_certificates(
		CertificateStatuses = [ 'PENDING_VALIDATION', 'ISSUED']
	)
	data = res["CertificateSummaryList"]

	for a in data:
		if a["DomainName"] == domain:
			return a

def acm_describe(arn):
	global acm
	res = acm.describe_certificate(
		CertificateArn = arn,
	)
	return res["Certificate"]

def acm_create(domain):
	global acm
	res = acm.request_certificate(
		DomainName = domain,
		ValidationMethod = 'DNS',
		SubjectAlternativeNames = acm_cname,
	)

def acm_wait_validation(domain, arn):
	global acm

	a = acm_describe(arn)

	while True:
		# Show what you should configure
		print("(*) You should configure CNAME Records for Validating Certificates: ")
		o = a["DomainValidationOptions"]
		for o_ in o:
			print('- %s: %s - %s (%s)' % (
				o_["DomainName"],
				o_["ResourceRecord"]["Name"],
				o_["ResourceRecord"]["Value"],
				o_["ValidationStatus"],
			))

		# Enter after configuration.
		print("(*) Enter after setting DNS CNAME Records: ")
		ignored_ = input()

		# Check the status of the issuance
		# You may need to wait for a certain time
		a = acm_describe(arn)
		if a["Status"] == 'PENDING_VALIDATION':
			continue
		elif a["Status"] == 'ISSUED':
			return True
		else:
			raise Exception("Unknown ACM Status: %s" % (a["Status"]))


a = acm_get(acm_domain)
if not a:
	acm_create(acm_domain)
	a = acm_get(acm_domain)

acm_wait_validation(acm_domain, a["CertificateArn"])
2
3
4
5
6
7
8
9
10
11
12
13
14
15
16
17
18
19
20
21
22
23
24
25
26
27
28
29
30
31
32
33
34
35
36
37
38
39
40
41
42
43
44
45
46
47
48
49
50
51
52
53
54
55
56
57
58
59
60
61
62
63
64
65
66
67
68
69
70
71
72
73
74
75
76
77
78
79
80
81
82
83
84
85
86
87
# [boto3] Create a CloudFront Distribution
The following script creates a CloudFront Distribution. The configuration of CloudFront Distribution creation has a lot of items, and as a result, it is quite complicated.
import json
import boto3

bucket_name = 'Bucket Name'
aws_region = 'ap-northeast-1' # Asia/Tokyo. Modify if you need.

dist_name = 'Distribution Name'

cf = boto3.client(
	'cloudfront',

	# You might not need to specify these AWS Keys in AWS env.
	aws_access_key_id = AWS_ACCESS_KEY_ID,
	aws_secret_access_key = AWS_SECRET_KEY,

	# Modify your own region
	region_name = aws_region,
)

s3_domain_name = '%s.s3.%s.amazonaws.com' % (bucket_name, aws_region) # S3 domain

# change for your app
domain = '{Your Domain}'
cname_list = [
	domain,
	('www.%s' % domain),
	('static.%s' % domain),
]

# ARN, or Amazon Resource Name, of the ACM certificate you have issued in the above.
# You need request to issue an ACM certificate if you don't have one.
acm_arn = '...'

cf.create_distribution(
	DistributionConfig = {
		'CallerReference' : dist_name, # Maybe anything is ok if it is unique for each distribution
		'Enabled' : True,
		'Aliases' : {
			'Quantity' : len(cname_list),
			'Items' : cname,
		},
		'DefaultRootObject' : 'index.html',
		'Comment' : dist_name, # Anything is ok.
		'Origins' : {
			'Quantity' : 1,
			'Items' : [{
				'Id' : s3_domain,
				'DomainName' : s3_domain,
				'OriginShield' : { 'Enabled': False },

				# This is neccessary if the origin comes from S3
				'S3OriginConfig' : {
					'OriginAccessIdentity': '',
				},
			}],
		},
		'DefaultCacheBehavior' : {
			# allow just HEAD/GET
			'AllowedMethods': {
				'CachedMethods': {
					'Items': ['HEAD','GET'],
					'Quantity': 2,
				},
				'Items': ['HEAD', 'GET'],
				'Quantity': 2,
			},
			'TargetOriginId' : s3_domain,
			# 'TrustedKeyGroups': {'Enabled': False, 'Quantity': 0},
			# 'TrustedSigners': {'Enabled': False, 'Quantity': 0},
			'ViewerProtocolPolicy': 'redirect-to-https',
			'SmoothStreaming': False,
			'Compress': True,
			# 'FieldLevelEncryptionId': '',
			# 'FunctionAssociations': {'Quantity': 0},
			# 'LambdaFunctionAssociations': {'Quantity': 0},
			# 'CachePolicyId': '658327ea-f89d-4fab-a63d-7e88639e58f6',

			# cache time
			'MinTTL' : 3600,

			# If you don't need any parameters, you don't have to change this
			'ForwardedValues' : {
				'QueryString': False,
				'Cookies' : { 'Forward':'none','WhitelistedNames':{'Quantity': 0} },
				'Headers' : { 'Quantity': 0 },
				'QueryStringCacheKeys' : { 'Quantity': 0 },
			},
		},
		# 'S3OriginConfig' : { 'OriginaAccessIdentity' : s3_domain, },
		'ViewerCertificate': {
			# ACM Certificate is neccessary with CNAMEs
			'ACMCertificateArn': acm_arn,
			'Certificate': acm_arn,
			'CertificateSource': 'acm',
			'MinimumProtocolVersion': 'TLSv1.2_2021',
			'SSLSupportMethod': 'sni-only',
		},
		'CustomErrorResponses': {
			'Items': [
				{
					'ErrorCachingMinTTL': 600,
					'ErrorCode': 404,
					'ResponseCode': '404',
					'ResponsePagePath': '/error.html',
				},
				{
					'ErrorCachingMinTTL': 600,
					'ErrorCode': 403,
					'ResponseCode': '403',
					'ResponsePagePath': '/error.html',
				},
			],
			'Quantity': 2,

		},
	}
)
2
3
4
5
6
7
8
9
10
11
12
13
14
15
16
17
18
19
20
21
22
23
24
25
26
27
28
29
30
31
32
33
34
35
36
37
38
39
40
41
42
43
44
45
46
47
48
49
50
51
52
53
54
55
56
57
58
59
60
61
62
63
64
65
66
67
68
69
70
71
72
73
74
75
76
77
78
79
80
81
82
83
84
85
86
87
88
89
90
91
92
93
94
95
96
97
98
99
100
101
102
103
104
105
106
107
108
109
110
111
112
113
114
115
116
117
118
119
# Check if S3 files are delivered via CloudFront
If each configuration is set correctly, you can see each s3 objects via CloudFront URL, then check the following:
- Upload
index.htmlwith somehing to the S3 bucket. - Check if you can see the file via CloudFront Distribution URL (***.cloudfront.net).
# Configure CNAME records in the DNS server
After the configuration of S3 and CloudFront, you need to set CNAME records in your DNS server to the CloudFront distribution.
example.com         IN A (EC2に関連付けしたElastic IPのアドレス)
www.example.com     IN CNAME ***.cloudfront.net
static.example.com  IN CNAME ***.cloudfront.net
2
3
If you don't use Route53, you can't set CNAME for naked domains, so in my case, I configure CNAME to an EC2 instance and allow it redirect to non-naked domain. If you use Route 53, you can set the naked domain for the CloudFront distribution.
Then after setting this, check if you can see S3 objects via the CloutFront distribution.
# Send Static Files in EC2 Instance to S3 Storage
The container of files is now prepared, then what you need to do next is to send static files to your s3 bucket so that the files are referenced to through CloudFront. If you put a CloudFront distribution before the whole network, you can create the separate configurations on the CloudFront distribution to access the appropriate destinations. Or you can also use another subdomain like "static.example.jp" to deliver S3 objects.
In this time I adopted the latter method. The specific method depends on the design of your website.
WARNING
The following script just syncs files between local env and S3 buckets, but actually unnecessary uploading may lead to unnecessary costs, so I recommend you to take appropriate measures for your system to avoid unnecessary uploads. In my case, I avoid overwriting the same content many times, limit the number of uploads per specific time, and send an alert if the number of uploads are unexpectedly large or some other problems might have occurred.
import os, re, json
import boto3

bucket_name = '{Bucket Name}'
aws_region = 'ap-northeast-1' # Asia/Tokyo. Modify if you need.

dist_dir = '/path/to/directory'

s3 = boto3.client(
	's3',

	# If you use this script in AWS env, you don't need to specify these AWS Keys.
	aws_access_key_id = AWS_ACCESS_KEY_ID,
	aws_secret_access_key = AWS_SECRET_KEY,

	# Modify your own region
	region_name = aws_region,
)

def get_content_type_by_path(p, default_type=None):
	ext = os.path.splitext(os.path.basename(p))[1]
	ext = re.sub(r'^\.', '', ext)
	types = {
		'gif' : 'image/gif',
		'jpeg' : 'image/jepg',
		'jpg' : 'image/jpeg',
		'png' : 'image/png',
		'webp' : 'image/webp',
		'html' : 'text/html',
		'htm' : 'text/html',
		'css' : 'text/css',
		'js' : 'text/javascript',
	}
	if ext in types:
		return types[ext]

	return default_type

def find_dist_files(dist_dir):
	if not os.path.isdir(dist_dir):
		raise Exception("dist dir not exists: %s" % dist_dir)

	res = []

	pos_ = len(dist_dir)
	for cur, dirs, files in os.walk(dist_dir):
		c = re.sub(r'^/',"",cur[pos_:])
		if c != "":
			res.append({
				"type": "dir" ,
				"name" : c,
				"path" : cur,
			})

		for f in files:
			p = "%s/%s" % (cur, f)
			name = re.sub(r'^/',"",p[pos_:])

			# follow symlink
			if os.path.islink(p):
				p = os.readlink(p)

			res.append({
				"type": "file" ,
				"name" : name,
				"path" : p,
			})
	return res

def s3_upload_file(name, path):
	global bucket_name,


	name = re.sub(r'^/',"", name)

	bin = None
	content_type = get_content_type_by_path(name, default_type="text/plain")

	if content_type.find("image/") == 0:
		with open(path, 'rb') as fp:
			bin = fp.read()
	else:
		with open(path, 'r') as fp:
			bin = fp.read()

	res = s3.put_object(
		Body = bin,
		Bucket = bucket_name,
		Key = name,
		ContentType = content_type,
	)

	return res

files = find_dist_files(dist_dir)
for f in files:
	if f["type"] == "file":
		s3_upload_file(name=f["name"], path=f["path"])
2
3
4
5
6
7
8
9
10
11
12
13
14
15
16
17
18
19
20
21
22
23
24
25
26
27
28
29
30
31
32
33
34
35
36
37
38
39
40
41
42
43
44
45
46
47
48
49
50
51
52
53
54
55
56
57
58
59
60
61
62
63
64
65
66
67
68
69
70
71
72
73
74
75
76
77
78
79
80
81
82
83
84
85
86
87
88
89
90
91
92
93
94
95
96
97
98
# Conclusion
The above is the way how I reduce the AWS costs with S3 and CloudFront, and as a result, this configuration also reduces the load of the servers, and because of this, it leads to improve the response.
This is just a personal feeling, but I guess CloudFront is quite less used than EC2, RDS, or other services in AWS (at lease in Japan). However, actually the configuration is simply simple and the benefit is great compared to what you have to do for this. Although I haven't constructed WordPress sites for months, I also expect the bigger effects can be achieved on WordPress sites, which are often likely to lead to heavy loads with many third-party plugins.